Mostrando entradas con la etiqueta images. Mostrar todas las entradas

miércoles, 27 de marzo de 2013

A Touring Exhibition

Q: What do the following all have in common:

two dead birds
a scrubbing brush
carrots, oranges and onions
a double-sided comb
a doll's leg
a nylon net
injectable saline solution
pink rubber gloves
a wooden frame
millions of transparent organic thingies?


[Do decide your answer before scrolling down.]


A:

Well
.
.
.
.
.
.
.
.
.
.


They form part of a touring exhibition called "Beach After Storm" which I was lucky enough to be invited to earlier this week.

Aren't they just lovely?

Here's another unsigned work by the same artist:


Have you ANY IDEA what the third one might be? Here's a closer look:


PS Yes I know this is supposed to be an EFL blog, but I am on holiday at the moment :)

All the best,

Le Garçon de la Plage


martes, 17 de enero de 2012

Mi no save mekim ol poster*

I thought I would share with you an attempt at a poster project. Whoop of triumph, cry for help or death rattle? You be the judge.


I have a class of four 10 year-old boys. Although the boys are no trouble whatsoever, I always feel at a loss trying to find appropriate content or materials for them - I have absolutely no formal training for YL. Or put another way, we all enjoy ourselves in class, but I have the sneaking sensation that they're not learning any English :)

Recently I thought we would try to make a poster in class. It would be about a single country, since we've done a few online quizzes in class and they generally like geography. We had a few goes at an online geography quiz as a warm-up. I specified that it couldn't be a European or Spanish-speaking country. The most geographically-curious student, A, plumped for Papua New Guinea, and the others were fine with that.

Now this was a bit of luck, because my old friend Tiziana had spent a few weeks there some years back. Did the lads fancy composing an email to her asking for her impressions and maybe a couple of her photos? Fine. So we team-wrote the email and I sent it.


Come lesson 2, Tizi hadn't let me down. So we looked at her text and photos, doing a little language work on them and composed a short reply, with thanks and a couple more questions.

What to do now in the rest of the lesson? Clever Alan hadn't given the slightest thought to this bit. In the end, we stumbled rather untidily to the end of the lesson, looking and reading snippets from YouTube and Wikipedia. Wish I had put more thought into this. (Surely the third conditional is the saddest tense...)

For the next lesson, I had found a couple of short relevant You Tube videos, although in the end they didn't make much impact on the lads. What actually crystallised them more was the results from Google Images. PNG is visually arresting, with spectacular flora and fauna,and dazzling cultural artefacts like carved masks and face-paint. It's also one of the least Westernized countries in the world, in whose highlands many people live largely stone-age lives, complete with terrifying inter-tribal violence, and the occasional practice of head-hunting and ritual cannibalism. Things which ten-year old boys love.

So by the end of lesson four, we had the poster wrapped up, complete with a few printed photos, their own hand-drawn illustrations and a couple of short texts.

Lessons learnt? Well, it was useful to find out the effectiveness of Google Images. And secondly, posters are fairly easy to do in class, logistics-wise - just some rudimentary art supplies. Thirdly. the reality of writing to a real person did make a difference, even at this young age. Fourthly, they seemed to enjoy making their own drawings more than I expected - I thought they'd opt for the slicker printout rather than the hand-drawn stuff.

And maybe most encouraging of all, the kids responded well to WEIRD STUFF.  The little glimpse into a faraway place. I'm not especially anti-coursebook, but I would like to see more weird stuff in books. Stuff that extends people's mental horizons more, rather than opting for the lowest common denominator.

But, I'm not all that happy about the amount of English used and produced. Essentially we spent four hours to produce a few short snippets and two emails. (And the emails were the result of a lucky coincidence.)

And I have no idea how to go about scaffolding or recycling the language generated.

And the poster itself can't be taken home to show to parents, either :(

Would I have been better preparing texts for them beforehand? I would love to find a more learner-driven way of doing research during class time, but with four young students, I just couldn't think of a way to do it. Any ideas?

*" I don't know how to make posters." in Tok Pisin.

miércoles, 22 de junio de 2011

What People Eat ...and what it's wrapped in.

I wanted to reply with a screen-capture to Sandy Millin's most recent post on her wonderful Almost Infinite EFL Ideas blog. This was in turn related to this slide show from Time.

In class with my individual adult student Jose we began simply looking slowly through the images. He instantly noticed one thing that I hadn't - the different amounts of packaging in the photos - compare the British family's food with the Bhutanese spread, for example, where there's virtually no 'future rubbish' in sight. So we re-opened a mind map that we had built up on previous occasions, and added a section on packaging, as you can see above.

Jose is one of those students who had  never seen mind maps before but took to them with a vengeance. Previously he had really taken the ball and run with it with an earlier version of this food map: He downloaded it from my Google Docs, found out mountains of vocabulary and re-uploaded his new version in time for the next class. As I blogged previously, I like to make mind maps in class, either digital or hand-made, but the curious thing is that you get all sorts of reactions to them, from familiarity to amazement to consternation to road-to-Damascus conversions.

And today, happily, lots of engagement.

jueves, 26 de mayo de 2011

Three for Mike

Dear Mike,

Hope these arrive in time.


For anybody else, these are an extension of this post.

Byyyyeeeeeee!

lunes, 23 de mayo de 2011

Video Grab

My group of 10-year-olds love Mr Bean.

from mrbean.co.uk (official site)
Say what you like about the rubber-faced git, but as soon as you say those two words in class a cheer goes up. I get their undivided attention for a full second or two. I can get them to stop punching each other just by dangling the mere carrot of a Mr Bean video in front of them.

But....


How does an English teacher use a video which doesn't have any English in it?

(Well given that plenty of people in my little PLN are expert teachers of young learners, and I'm still a total newbie at it, there are probably loads of ways. But this afternoon I stumbled on one at least. So here goes...)

I found a suitable MB video on YouTube (in this case The Library). There are plenty of them there.

As I watched I made a list of some of the key actions, which I transferred to little slips of paper. Thus...

(Well, as you see, they weren't all actions)

And that's pretty much all the preparation I had to do.
In class we watched the video once. No questions, no prep - just watched.

Then I presented and drilled the cards, and practised a bit, spreading the cards out on the table.

Then I told them they had to watch the same video and grab the relevant card when the action happened, or the object appeared.

Which to my surprise worked a treat.

Kids of this age seem to be very competitive, and enjoy games, I find I have to be a very strict, very fair referee during class games. So there were penalties for grabbing more than one card, grabbing the wrong card, grabbing too early, blatant obstruction, life-threatening violence and eight million other infringements. And they all had to keep their hands below table level between grabs.

But it worked fine. So I tried it again with my 8-year-olds the lesson after. Which also worked fine, though with them I reduced the number of cards from about a dozen to nine, if memory serves me right.

And of course if you keep the cards, you can repeat weeks or months later. By the way, here is a very comprehensive post on vocabulary revision and recording by Chia Suan Chong

And I may be able to use Laurel and Hardy with them sometime in the future.

And that surely is progress.

jueves, 31 de marzo de 2011

Always on my mind...

This mini-tutorial is in honour of the great visual thinkers on my PLN - Naomi Epstein, David Dodgson, Jason Renshaw, Jamie Keddie and of course David Warr . It's about making digital mind-maps using Freemind. Part One is about viewing maps, and part Two about creating and modifying them.

Viewing mind maps:

 Modifying and creating mind maps:

Freemind is available here.

A summary of basic commands in Freemind:

1. To move the map, drag the background, not the map itself.
2. To zoom in or out, Ctrl + mouse wheel.
3. Hover over an element to highlight it.
4. Hold Alt to freeze the highlighting so you can move the mouse elsewhere.
5. Highlight, then Insert to add a child node.
6. Highlight, then Enter to add a sibling node.
7. To move a branch, drag and drop to the tail of its new parent.

What you can do with them:

a) Having made a map in class on the board, make a digital version after.
b) With a little familiarity and a decent screen, you can make them live in class.

Having made a digital map you can:

c) Keep in your own archive for future classes.
d) Send to students for their records, or to modify themselves for homework.

By the way, if you want a copy of the Phrasal Verbs map, here's the link in Google Docs.

Edit: I don't think Blogger lets me post files so that viewers can download them directly from here. If somebody knows to the contrary, do let me know.


martes, 29 de marzo de 2011

Veni , vidi, wordli

I get the photos, the students, write, paper, and Ask  but who the hell is David Green? Thanks to the other Dave for the idea.

martes, 22 de marzo de 2011

I can explain everything...

David Deubelbeiss at EFL Classroom 2.0  posted this morning about photographs - "the fundamental intermediary for context in language teaching" as he writes. While I found myself agreeing totally, I also realised that my main use of photos is entirely different, and the photos I tend to use are also different. Which is one of the joys of a humanistic job, don't you think? No wrong solutions, and lots of right ones.

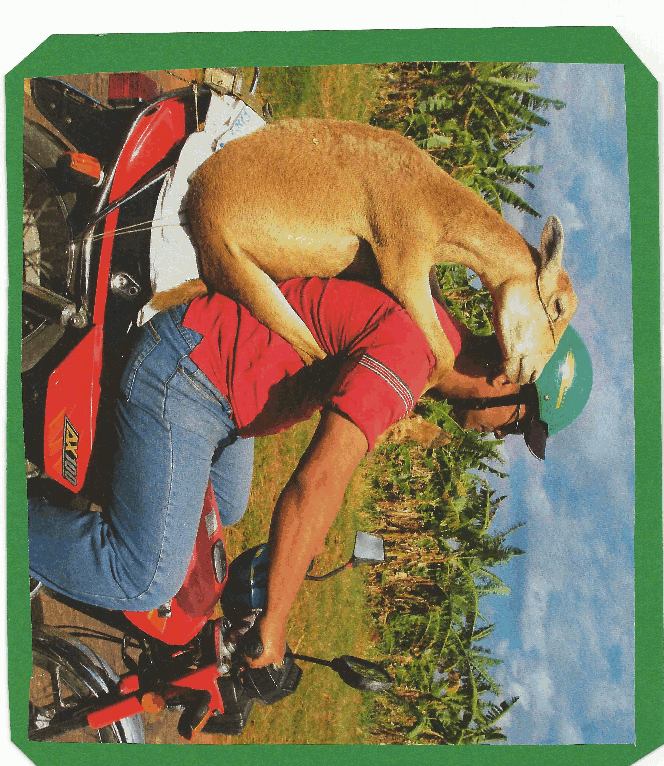
My own photo library - built slowly from magazine cutouts - has a selection of the lexical sets David mentions and includes in his post. However the ones I come back to again and again are all very similar: all cryptic or incomplete, and almost all captured rather than posed. Here are a couple of my favourites. (I also take the time to cut them out and mount them on decent card to protect them, by the way.)


NB These were cut from magazines, so are not in the public domain. I'll let you know if the Copyright Gestapo kick my door down in the middle of the night.

Here's one activity you can use with teens upwards and lower-int upwards.

I Can Explain Everything

1. Choose one cryptic or strange photo for each student. Don't give them out yet!

2. Ask the students to sit as far apart as your classroom will allow - this is an individual exercise, so give them space to think.

3. Explain that they will each get a photo and a blank sheet of paper. They will have to look at the photo and write a few sentences explaining or interpreting the picture at the top of the paper. Make it very clear you want an explanation, not a description. Ask them to write legibly.

4. Give out the photos and leave them to think and write in peace - usually 2-4 minutes is enough, but play it by ear. Be on hand if they call you, and monitor unobtrusively near the end of the time limit. (I usually do the same as them, BTW.)

5. Ask them to draw a line under their paragraph. Tell them that they are going to get a new photo and paper, which will already have an explanation. They will have to look at the new photo, read the existing interpretation, and write an alternative one, which must be totally different.

6. Ask them to pass the photo and paper to the student on their left, then look, read and write.

7. Repeat this until each photo has been round the class once. You will have several different interpretations of the same photo written on the same sheet.

8. Pin up each photo on the wall, with its paper, allowing students to mill and read. They can each vote for their favourite interpretation - but of course, can't vote for their own.

9. Round up vocabulary.


This lesson has the great boon that it allows your students to appear smart and imaginative to each other, which is vital with adolescents. I haven't tried it with younger learners - as always I'd love your feedback.

PS In a lovely moment of synchronicity, I found this glorious collection online.